Payload Ready

Conditions still look pretty bleak for a dry launch from Youlbury tomorrow. I’ll make the final decision at around 16:00-17:00 today. Despite that, I have made the payload ready to go. I went through several ideas as I built it up but ended up mounting the tracker board on some foam sheet and the boost regulator and battery pack on the back. Originally I was going to wrap this up but it occurred to me that I could leave it exposed to show the Scouts and cover it tomorrow just prior to launch.

CHEAPO-VAYU Payload

CHEAPO-VAYU Payload ready to launch.

The center insert shows how I configured the antenna. 163mm 1/4 wave antenna for 434.300MHz and 4 radials at 90 degrees each. In the center image, you can just see the sleeve at the top. This will be slid over the payload and sealed at both ends with gaff-tape just prior to launch. The payload hangs at an angle due to the weight of the batteries. Before I launch another VAYU I will see if I can come up with a better idea for keeping the payload hanging straight. In this instance it isn’t too much of a problem because I can give the antenna a small bend to compensate. The antenna wires are made of plated guitar strings, as suggested by Leo Bodnar, a fantastic idea. To make the ends safer than just leaving them open, I folded back the ends and put a blob of solder on them.

Ernie Ball Custom Plated Guitar Strings - Gauge 13

Ernie Ball Custom Plated Guitar Strings – Gauge 13

Posted in VAYU | Tagged , , , , , , | Leave a comment

Vayu v1.01 PCBs

I just wanted to do a quick post to show the VAYU v1.01 PCBs that just arrived fresh from Hackvana.

Vayu v1.01 PCBs

Vayu v1.01 PCBs fresh from Hackvana

They are absolutely top quality. I’m amazed that the text came out despite being out of tolerance. I decided that I didn’t mind if the text didn’t work for the prototype so I instructed Hackvana to go ahead with fabrication despite this. It was entirely my responsibility.

I was extra pleased to find that there’s two additional PCBs in the package. I was previously told that sometimes, if there’s space, Hackvana will supply spare boards free of charge but I didn’t expect any. What a great service!

Vayu Cheapo comparison

Comparing the CHEAPO and VAYU v1.01 boards

I thought I’d show the two boards side-by-side to show the modifications I made to Chris’s original CHEAPO design. The Micro-SD Card socket removed, Boost regulator and breakout header added. Stay tuned for building!

Posted in Payloads, VAYU | Tagged , , , , , , | Leave a comment

Vayu-NTX

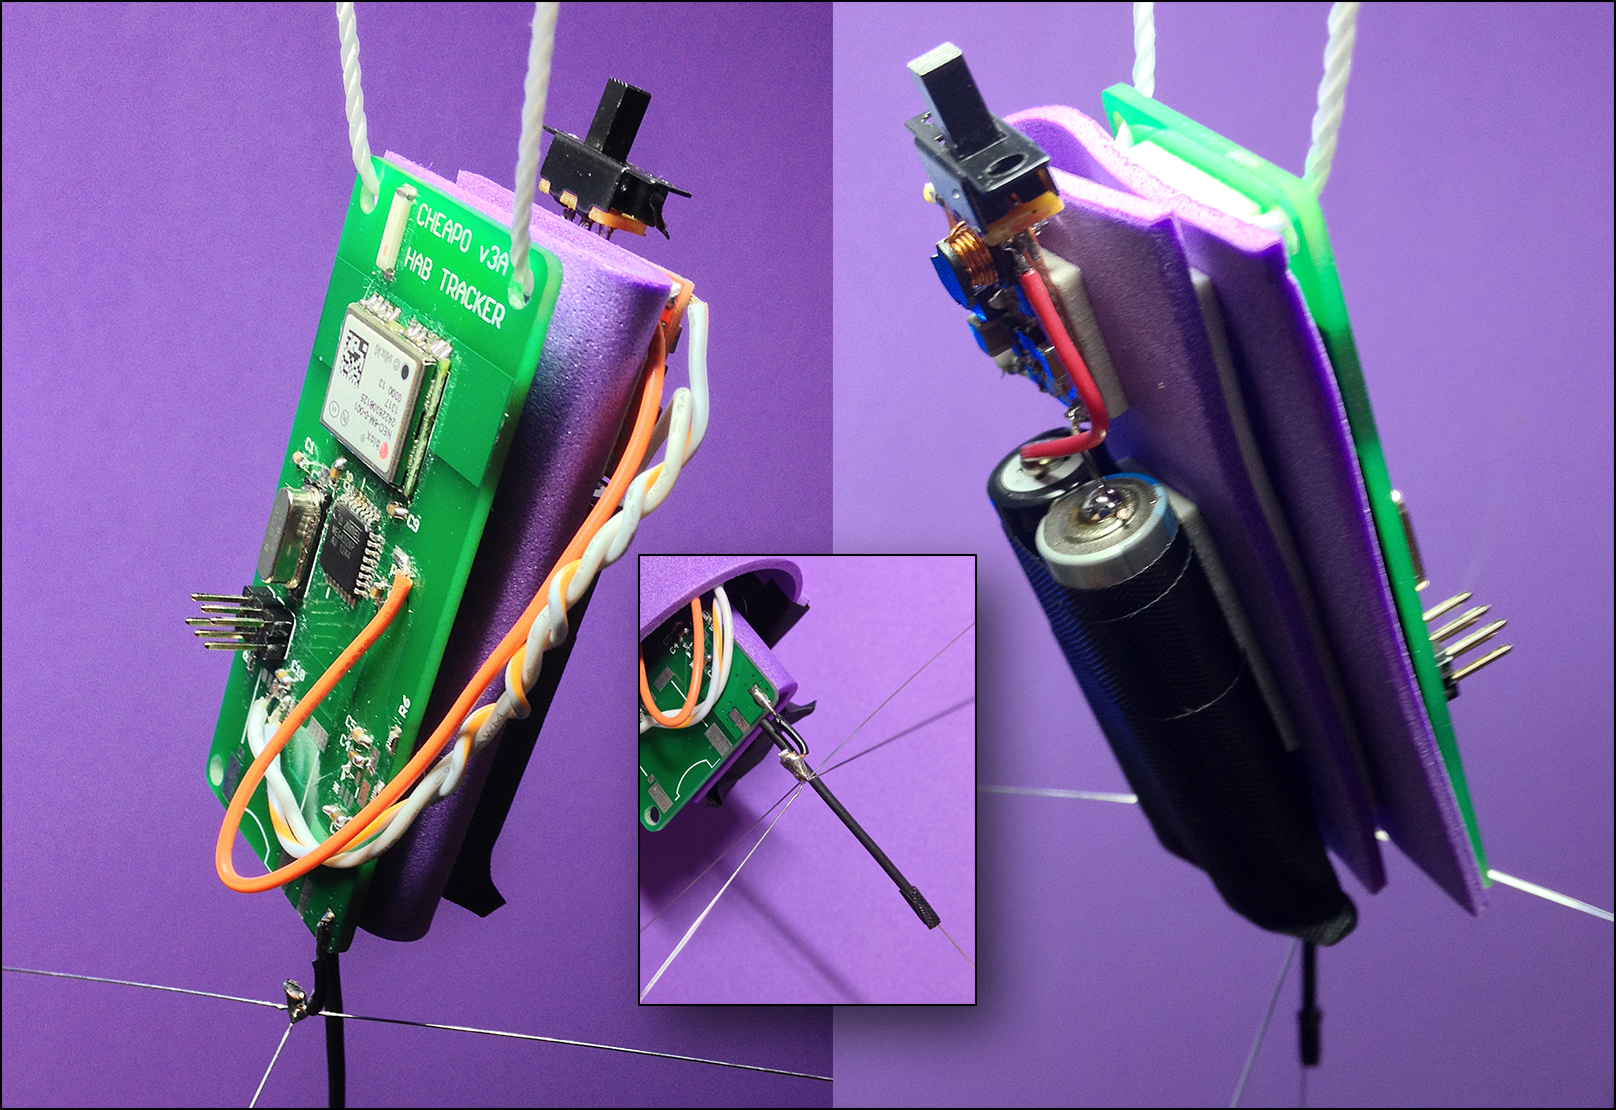
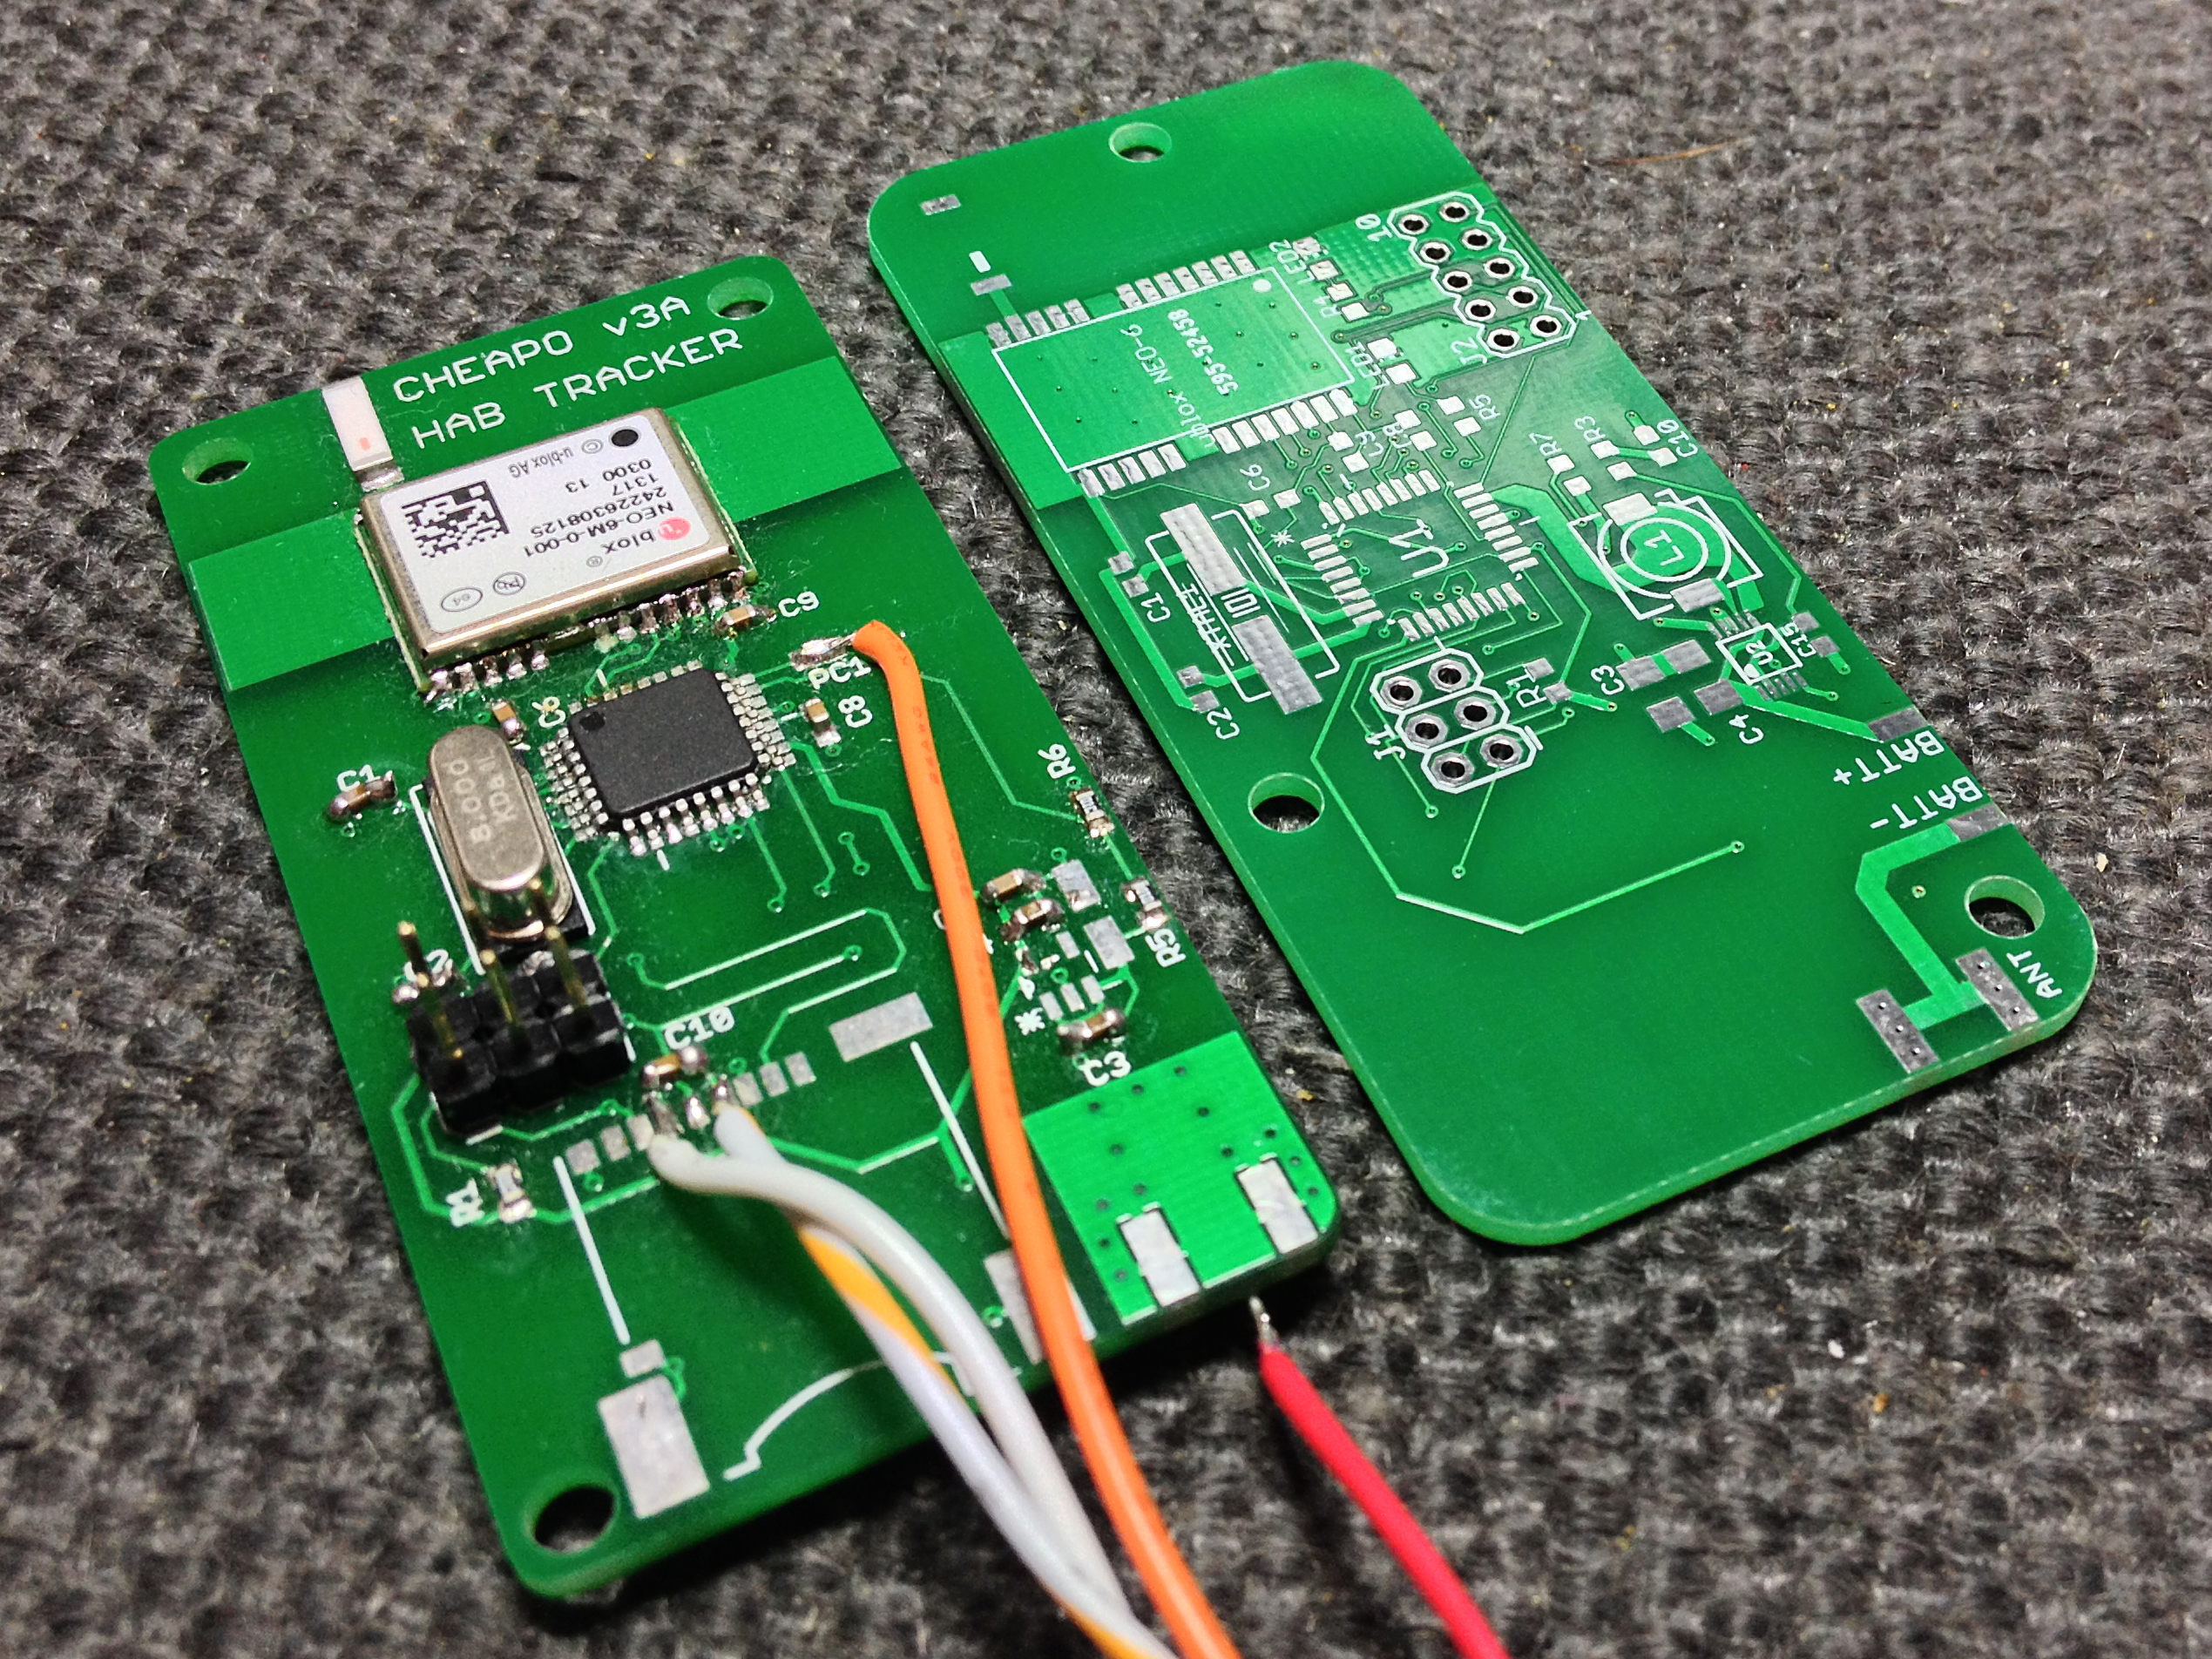
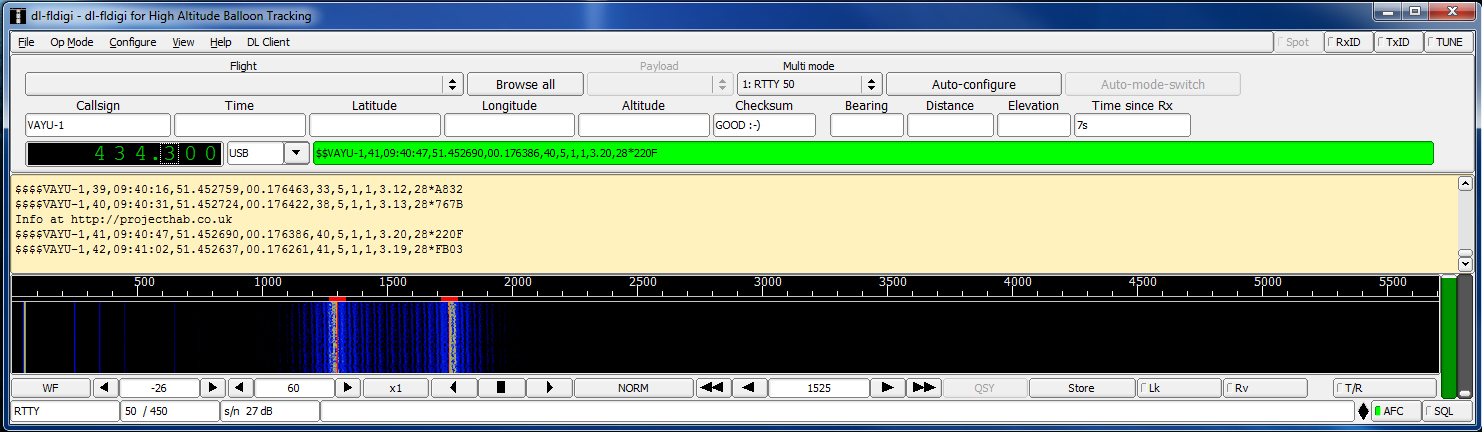
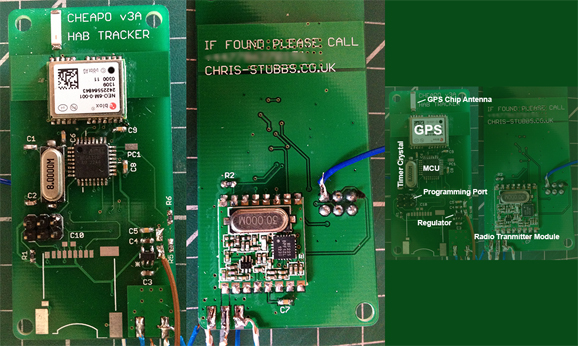
When field testing my re-design of CHEAPO into VAYU I noticed that the transmit frequency is easily affected by ambient temperature. Although this tends not to be too much of a problem once the payload is several kilometers up and stabalises, I wondered if I could improve the performance.

I’ve followed quite a few launches and the more stable tracker circuits seem to use the Radiometrix NTX-2 modules. After downloading the datasheet and skim reading it, I thought I’d have a go at designing a tracker PCB replacing the RFM22b Tx module with an NTX-2. Knowing I didn’t have a suitable component library for Eagle, I had a look around and found that Anthony Stirk had included it in his AVA library. Be sure to click on RAW and ‘Save As’ the page as Ava.lbr to use.

Having had the experience of designing the boost regulator circuit for the VAYU prototype, I had a good idea of how to lay out a new version. I started by changing the circuit by substituting the RF modules. I then started a new PCB layout and roughly placed the components. I found that the most efficient way to lay out the different sections of the circuit was to start with the boost regulator and build around it. I tried several layouts before I was satisfied. I then made up the coil traces from polygons as per the previous design and routed important tracks, for the crystal for instance, manually. Once I was satisfied that I’d done my best I set Eagle to auto-route the rest. It wasn’t too successful and left a lot of air wires (yellow lines indicating a connection is required). Track by track, I manually routed the remaining connections through two layers, frequently checking the design rules to make sure I was within tolerances. Again, I used the Hackvana DRU file since, if I get the board fabricated, I would use their services.

Vayu-NTX v1.0 tracker pcb

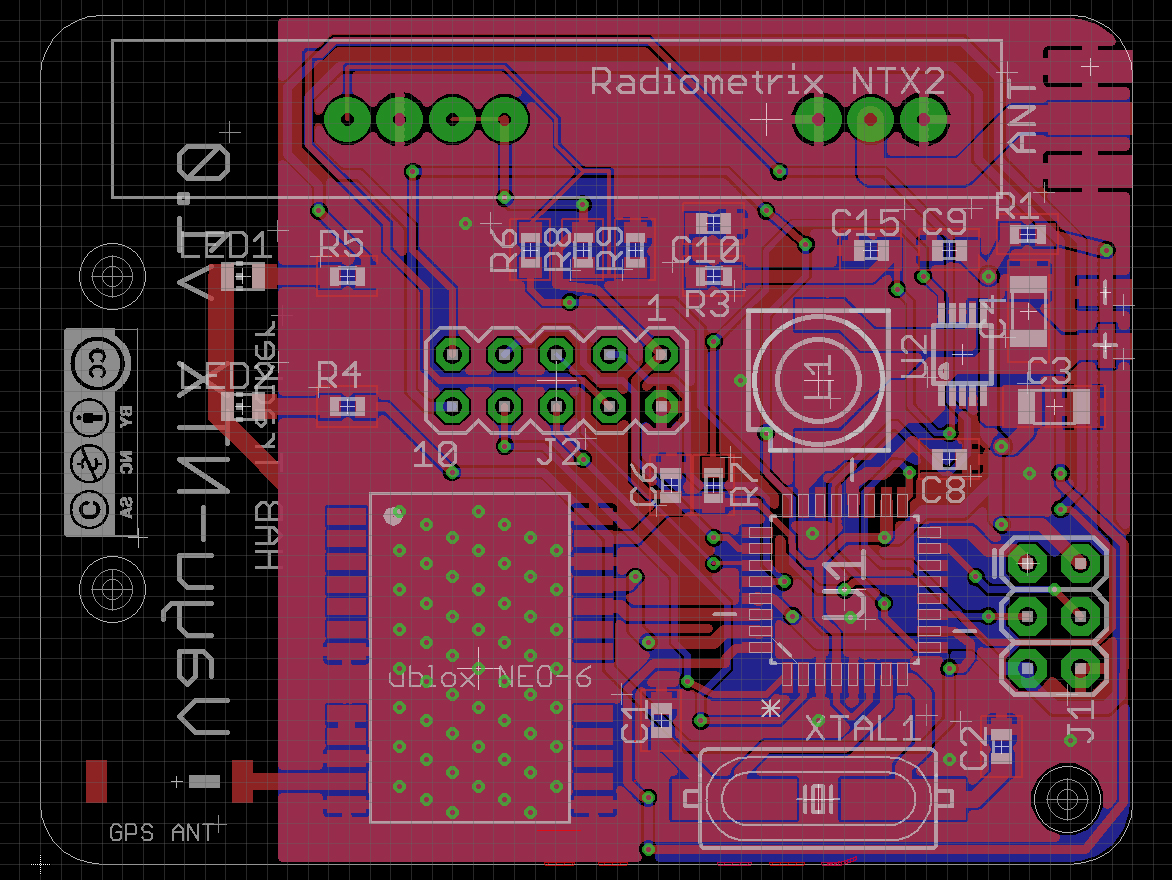
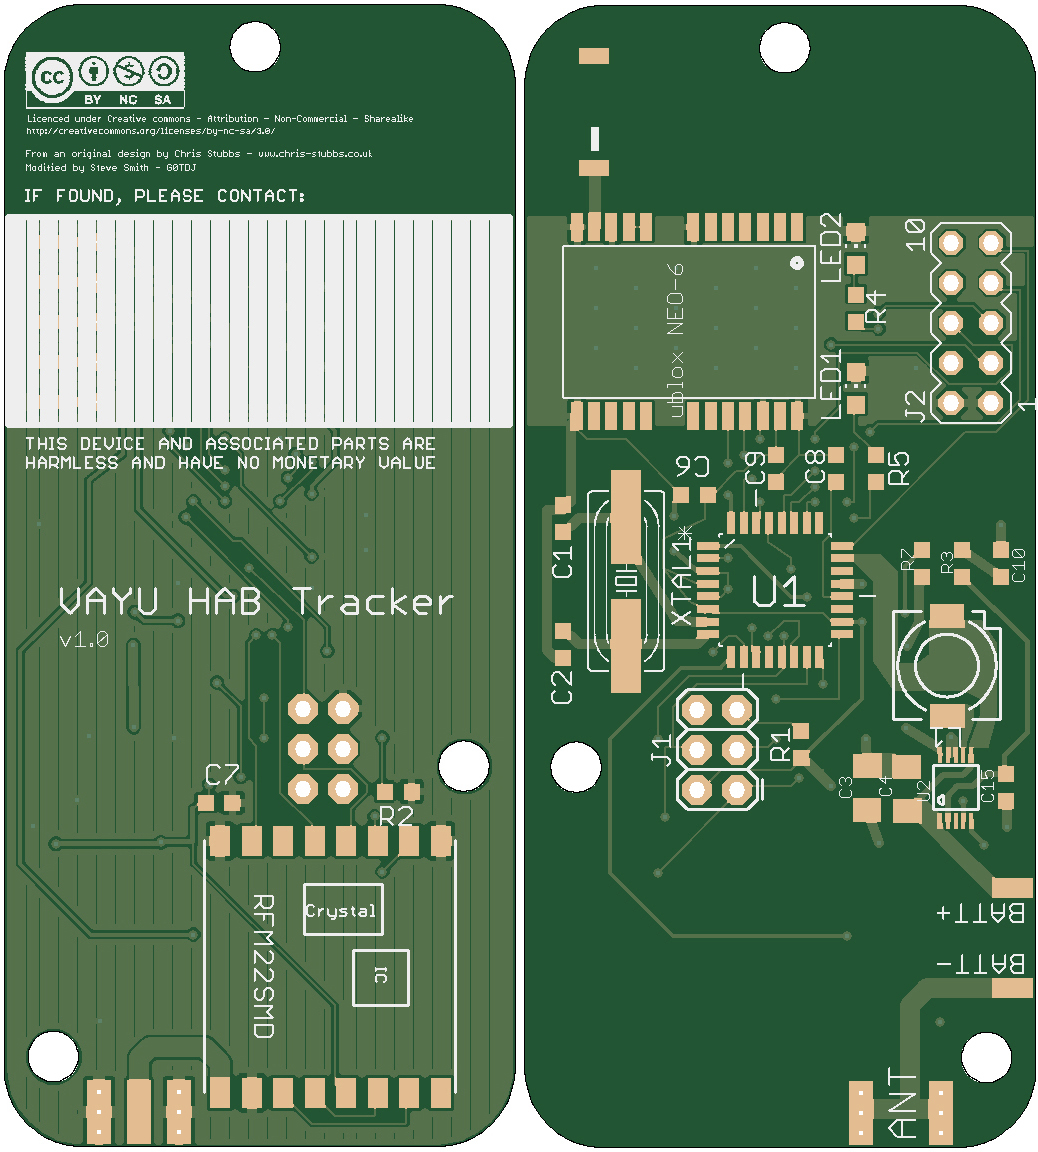
Vayu-NTX v1.01 tracker pcb

For convenience I have rotated the screen capture 90 degrees anti-clockwise. As you can see from the layout, I have retained the breakout header as well as the programming header. Also I have included two holes at the top of the pcb (left) for suspending the board as a payload.

I am unsure whether or not I will have these boards fabricated as-is because the boost regulator circuit is untested. But if the VAYU board works then I will have a small run of these VAYU-NTX boards fabricated by Hackvana at some stage. Although this took a good couple of hours to complete, it was great fun and rewarding to see a final design on the screen. The final steps, if I have the boards fabricated, will be to make sure the text is printable, add the creative commons licence logo and tidy a few tracks.

Both the VAYU and VAYU-NTX designs will be available from this site once testing has been completed. This will include PDF circuit diagram and track patterns, Eagle files and Gerber files. These will be licensed under Creative Commons Non-Commercial, Attribution, Share-alike.

[UPDATE]

To illustrate the constant tweaking and updating designs, I’ll post the image of how the board looks now. After a chat with my good friend Chris, at my request, he pointed out a few things I could improve on.

Vayu-NTX v1.0 Updated

Vayu-NTX v1.02 updated tracker pcb

If you compare the two images, you can see I have moved the groundplane (GND) out of the way of the GPS antenna. I re-routed the two tracks that encircled the GPS antenna anther way. This was a lot of work but worth the effort. I also moved C4 since it is a de-coupling capacitor. The final two changes were to add a polygon to connect the LEDs to the now missing ground and to flip the text on to the back of the board to give it more space.

[UPDATE]

After showing the design to several of the great guys in the IRC channel #highaltitude, I was advised that I could lay the board out in a better way. The concern was that my layout wasn’t as efficient as it could be. I decided to try a new layout with the NTX module at the base allowing a short, straight connection for the RF Out pin. I was also advised that the uBlox MAX series had better performance than the NEO series, so I decided to substitute in a uBlox Max7 unit. It also occurred to me that I could make more of the AVR pins available. I started the board layout form scratch bearing in mind all the pointers I’d been given.

VAYU-NTX v1.03

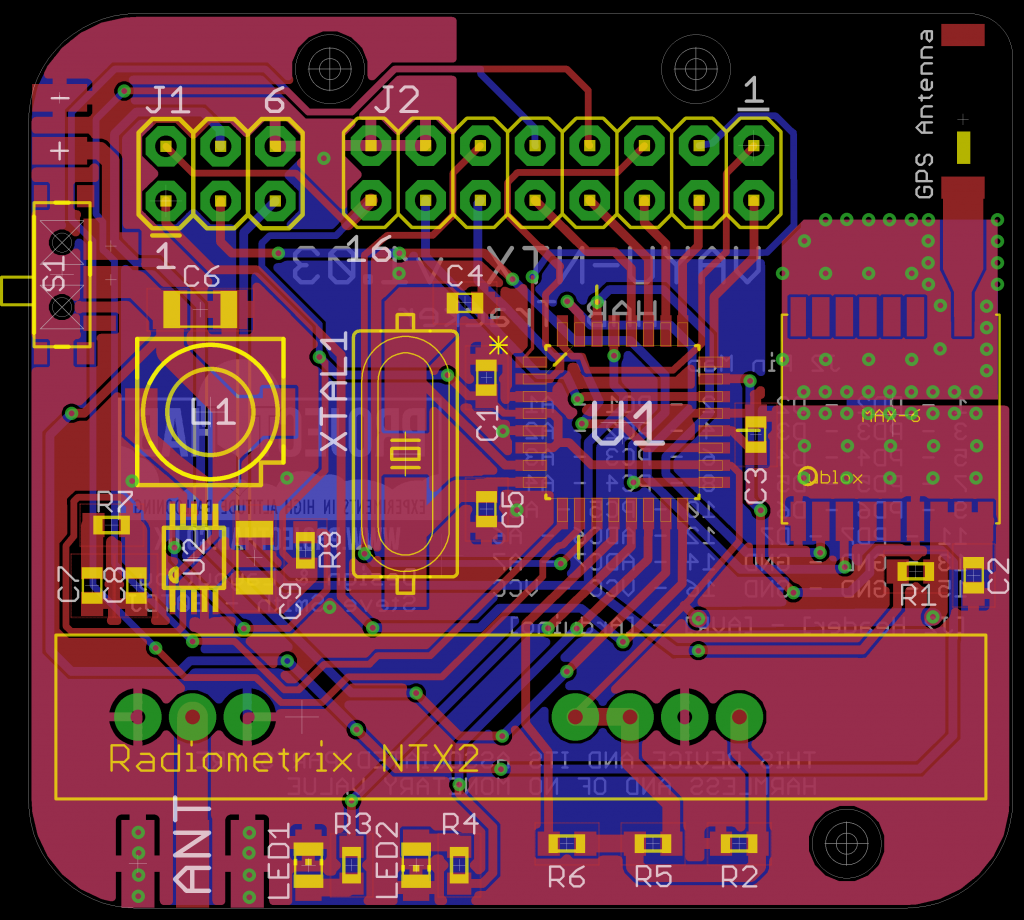
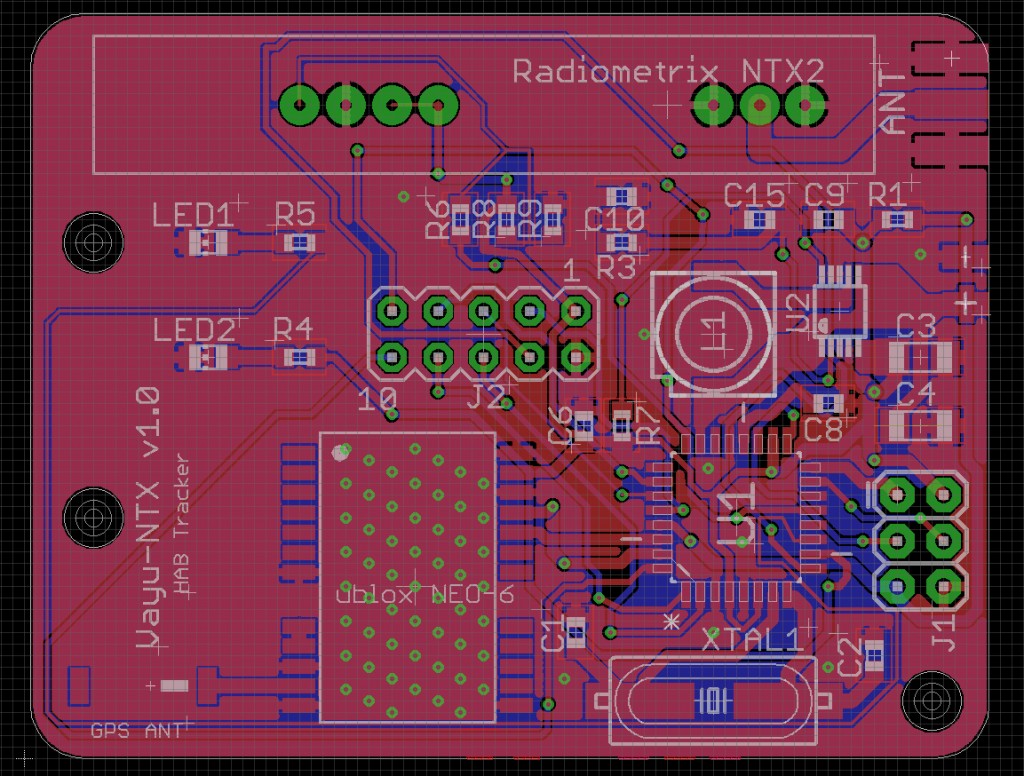
VAYU-NTX v1.03 previewed in Eagle

Another small modification I made was to change the component outlines to yellow to make them show up more than the original white. As you can see, the layout is completely different. Components have been placed to maximise their efficiency. Also, thanks to Ed (eroomde in #highaltitude) I split the ground plane under the GPS module to minimise noise from the AVR from affecting the acquisition of data. I am very happy with this mostly hand routed board. I currently await an order of 10 from Hackvana.

VAYU-NTX v1.03

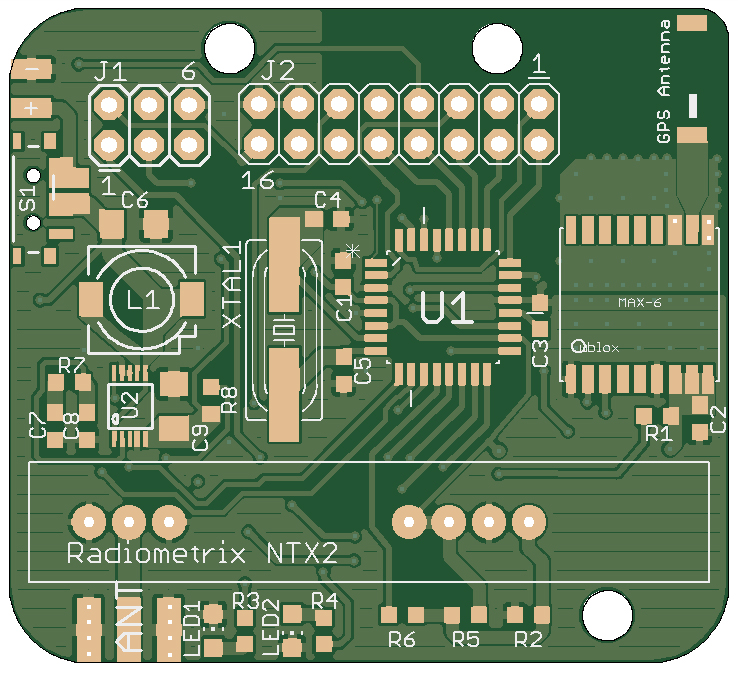
VAYU-NTX v1.03 previewed on www.gerblook.org


Posted in VAYU-NTX | Tagged , , , , , , , , , , , | Leave a comment

A Crash Course in Tracking HABs

To simply see where balloons are and to track their course, go to the website: SpaceNear This site shows positions of balloons live with various telemetry. At the top left hand side is an info panel with current notes on launches and a link to the #highaltitude IRC channel. Over on the right hand side are various panels showing telemetry from payloads and chase vehicles if present. You can quickly pan to a particular balloon by clicking on ‘Pan To’ in it’s information box. The information shown in these panels is retrieved by many receiving stations which are denoted by the small tower icons on the map. These stations receive the telemetry directly (or remotely) from the balloon’s payload via radio and then feed it to the Habitat website. In the background, the Habitat website parses the telemetry string and feeds it to SpaceNear.us for display. Around each of the balloons on the map are two circles. The outer blue circle is the one degree footprint. This gives the range of the balloon approximately from ground level. The inner green circle is the five degree footprint. Using these two circles, you can get an idea of when you should be able to hear the telemetry from your receiving position.

When the signal is received by a receiving station, the audio is fed into a PC/Mac etc. or in the case of SDRs, routed from the SDR software to a program called dl-fldigi This is a special version of this program, specific to HAB. The radio is then tuned to the HAB, the most common band used being the 70cms band (430MHz). Two modes of sending the telemetry are used commonly, these are RTTY (Radio Teletype) and Domino. The settings can be entered manually but for scheduled flights, there is an easier way to configure the software. By selecting the list box to the left of ‘Browse All’ on the dl-fldigi front panel, a list of current flights is normally available. You can click on one of these and then click on Auto-Configure. This sets the software up for the payload that you selected. If the payload is not listed, then you can click on ‘Browse All’ and then ‘All Payloads (Testing)’ and find the closest match to the balloon you are trying to track.

Once you have audio being routed to dl-fldigi, you will see the waterfall active. This gives a visual representation of what the radio is hearing. When you tune the radio and spot the signal you’re interested in, you can click on the center of the signal in the waterfall to attempt decoding. I have found that the most reliable decoding happens with the center of the signal is around the 1500 mark. Successful decoding results in the telemetry bar going green or turns red if the signal was corrupted. With an RTTY signal, it’s a good idea to have the AFC set on in the bottom right hand corner of the dl-fldigi panel. When you successfully decode and upload telemetry with dl-fldigi, your callsign that is set in the operator options appears in the info panel for that payload on the SpaceNear.us page.

Before using dl-fldigi, be sure to set your details, especially your position, in the options. To set your personal details, go to Configure – Operator. To set your location, go to DL-Client – Configure – Location In here, the Latitude and Longitude needs to be set to place your icon in the right position on the map. You can find your Lat/Lon on Google Maps Right-click on your physical location and then ‘What’s here?’ and your Lat/Lon in decimal will appear in the search bar. You can cut’n’paste these values into dl-fldigi.

For further information and illustrations, there is a great page on the UKHAS website.

Posted in Payloads, Tracking | Tagged , , , , | 1 Comment

Every 10th Sentence

It was suggested by Kristaps (User x-f in #highaltitude) that rather than interleaving this website’s address with the telemetry for VAYU, I should insert it every 10 sentences sent. I had previously thought of this but didn’t know how to code it and got side-tracked away from the problem. Kristaps suggested I use the code:

if (sentence_id % 10 == 0) { tx_link();}

or something like it. I examined the code to see how I could implement this. The old code read:

sprintf(datastring,”%s%s”,datastring,messagestring);

This takes the constructed sentence, for example ‘$$$$VAYU-1,107,09:55:51,51.452759,00.176324,24,10,1,1,2.96,29*2D2A’ and adds the messagestring (Info at http://projecthab.co.uk) to the end of it making:

$$$$VAYU-1,107,09:55:51,51.452759,00.176324,24,10,1,1,2.96,29*2D2A
Info at http://projecthab.co.uk

Embedded carriage returns format the sentences correctly. What I needed to do was use the ‘if’ statement to check the count and see if it was a 10th count. The method Kristaps suggested uses modulo, something I remember the name of from way back at school. At first I constructed an ‘if-else’ statement structure but I realised that this was not necessary. Either I needed to insert the messagetext or just leave the telemetry alone. So I constructed the line:

if (count % 10 == 0) sprintf(datastring,”%s%s”,datastring,messagestring); //Insert info every 10 sentences

This works a treat and I have soak tested the board to make sure. Here is the output shown in dl-fldigi (HAB Mode)

VAYU Info on 10th sentence

VAYU Telemetry showing the info line inserted after the 10th sentence.

This will be much better for trackers and will have the effect of making the map plots smoother. My thanks go to Kristaps for his suggestion and code snippet.


Posted in Tracking, VAYU | Tagged , , , , , | Leave a comment

Launch Announcement

I’ve been invited to launch a balloon at Youlbury Scout Activity Centre in Oxford on 20th October. It will be as part of their JOTA/JOTI event.

JOTA-TI 2013 Poster

JOTA-JOTI 2013 Poster

JOTA (Jamboree on-the-air) is a yearly scout event based around radio communication. It appears they have included the internet now as well, and quite rightly so.

I’m hoping to launch my very first balloon. It will be a ‘Pico’ sized balloon with the VAYU prototype PCB as a payload. I have two weeks to prepare and get VAYU sorted out properly as a payload. This will involve re-programming the callsign so that it no longer says ‘_TEST’. Building a decent GP (Ground Plane) Antenna, placing it in an enclosure and planning the lines to suspend it from the balloon. Because VAYU is very small, I’m not planning on using a parachute. The chances are it will come down relatively slowly anyway. However, I still want to ensure that it doesn’t damage anything upon landing. To this end, I have found some hollow polystyrene spheres sold in a craft shop (Hobbycraft here in the UK). There’s plenty of room for the PCB and batteries. I will pack the excess space with stuffed toy cotton to prevent the parts from moving around in flight.

I’m hoping to have someone along to take care of communication with the scouts and HAB community and also document the day in photographs. I am going to try and have an online stream to show the launch live if possible. I’ll be testing that in the next few days.

I have also asked the general HAB community if there’s anyone available on the same day to launch a full size latex balloon from the same location. The one big issue with this is, unlike my small Pico launch, the large ones need CAA clearance and there may not be enough time to secure it.

Posted in Tracking, Uncategorized, VAYU | Tagged , , , , , , , , , , , | Leave a comment

Testing-Testing

I’ve been doing some further tests on my payload VAYU whilst I wait for the new PCBs to be fabricated. This is the prototype built from Chris Stubb’s CHEAPO PCB with an added boost regulator. I wanted to see how long it would run for on a pair of almost new Lithium AAs. The boost regulator is meant to be able to take 1.5V and boost it to 3.3V after the small resistor modification. I was surprised to find that with two AAs in parallel it wouldn’t fire up the board. I re-tried it from PSU and it was fine. I can only assume it’s lack of current, although the batteries are supposed to be able to peak 1A.

My solution was to connect the batteries in series and feed the boost regulator with just under 3v. The board happily works at this level. Since I was going to send two AAs up with the payload anyway, it doesn’t matter with regards to weight. The only impact may be performance. I ran the board for a while to see how stable it was and it performed adequately. I then put it in my freezer. It was very interesting to see how far the frequency drifted and how fast it went on it’s journey down to -7deg (internal AVR reading). I left it there for around 15mins and it worked fine. I then placed it on the window sill and left it for 4hrs. The frequency stabilised after a few minutes and it ran quite happily. By the end of the test, the batteries still read at 2.83V.

VAYU Freezer Test

Testing the VAYU Prototype in the freezer.

Another thing I did was re-program the AVR to send out this website’s address interleaved with the telemetry. Before flying, I’ll have to remove the _TEST in the callsign. This is a pretty easy process which I will document at some stage.

Posted in Payloads, Tracking, VAYU | Tagged , , , , , , , | Leave a comment

CHEAPO Re-Design

Recovering Chris’s balloon and payload was great fun and as a thank you for doing so, he gave me an unpopulated circuit board of his HAB Tracker he called CHEAPO.  I slightly modified this board under Chris’s direction to use an external boost regulator rather than the on board regulator. This allows the board to run on 2x AA Lithium Batteries. The boost regulator takes the 1.5V and raises it to 3.3V This is all very well but a little cumbersome having another circuit board connected. It is also a very inefficient design.

With this limitation in mind, I begun to wonder if I could re-design the circuit to have a built in boost regulator and maybe add a few other bells and whistles. After a bit of research, I came across the Texas Instruments TPS1006 device, which with a few other components, makes a nice efficient boost regulator. Upon reading the datasheet, I set about designing a layout based on Chris’s CHEAPO design. I removed the regulator circuit and replaced it with the boost regulator circuit. When I showed Chris, he kindly pointed out a few of my design blunders. I use Eagle for my circuit and circuit board design. Mainly because the base version is free. Although limited, it’s adequate for most hobby sized PCBs.

I had updated the design but meanwhile, I had found another Texas Instruments device that did the same job with fewer components, the TPS61016. I replaced the TPS1006 in the circuit and re-did the layout. Chris then pointed out that I hadn’t made the pads big enough for the current that would be drawn by the coil and capacitors in the boost regulator circuit and advised me to follow the datasheet more closely. It took me a few attempts but I finally managed to create a layout with regular connections and polygons placed on the board. I also tightened the component placement too.

VAYU Layout in Eagle

Almost finished, the VAYU layout in Eagle showing all layers.’

This will be a challenging board to make due to the minute connections on the SMD TPS61016. As well as adding the boost regulator to the board, I also removed the micro-SD Card socket, added 2 LEDs and a 10-way DIL connector which breaks out some of the ATMEGA328p I/O pins. On the rear I added an area in white for contact details to be written in permanent marker, indication that the board was made under a Creative Commons license with due credit to Chris for his original design and the name of the board, VAYU Version 1.0

VAYU Gerber Output

The board rendered on http://gerblook.org/ to check the Gerber files.

I will be using Hackvana to fabricate the boards so I used both their DRU (Design Rules) and CAM (Computer Aided Manufacturing) files. The DRU file indicates Hackvana’s minimum design sizes and specifications. Within Eagle, it is a good idea to check as you go to avoid lots of work later. Once complete, the design is processed using the CAM file. This outputs a set of ‘Gerber’ files which tell the fabricator’s machines how to create the board. Hackvana make this easy by requesting you zip up all the files produced and send them.

This has been a great learning experience and I feel that I could now probably design my own board from scratch. I may well do this in the future. In the mean time, I am waiting for funds to get the board fabricated and to collect the components together to build it.

Many thanks to Chris who gave me lots of his time and pointed me in the right direction a number of times.

 [UPDATE]

With a little help from Mitch at Hackvana, I have ordered some boards. Stay tuned for building and testing when they arrive.


Posted in Payloads | Tagged , , , , , , , , , | Leave a comment

Anatomy of a Tracker

While I await components and other things, I thought I’d show a tracker and identify the pieces. In my very limited experience of HAB, most trackers have common component parts so this one, designed by Chris Stubbs, probably takes ques from many other such devices.

CHEAPO Anatomy

An image of Chris Stubbs’s HAB Tracker board CHEAPO – Labeled

This is the actual payload that I recovered for Chris on the 7th July 2013. Near the top of the double sided board on the top solder side is the GPS module. Made by uBlox, this appears to be the most popular of the GPS modules. Just above it, is the vey small chip antenna. Amazingly, this antenna works extremely well. Under the GPS module is the MCU (Micro Controller Unit). In this case it is an Atmega 328p in a TQFP surface mount package. To the left of it, the long silver shape marked 8.0000M is an 8MHz crystal which oscillates and is the clock that the whole device runs from. Just below these is a 6-pin DIL header to connect the programmer. Many programmers can be used to program the MCU but I use a BASP compatible type purchased from eBay for around £6.00GBP. To the right hand side of the circuit board near the brown wire is the regulator to maintain a constant voltage from the battery (not shown). On the rear of the board is mounted an RFM22b radio transmitter module.

This is a bit of a wizz-bang tour but the common components in any tracker board are the GPS to collect positional telemetry and supply the time, an MCU to collate the telemetry and add any other data required, such as the status of a switch, temperature or pressure readings. Or maybe you would like to have a teddy bear jump at a certain altitude. And finally a transmitter to send the telemetry to be received by stations on the ground.

Posted in Payloads, Tracking | Tagged , , , , | Leave a comment

Introducing Vayu

So, I have a HabDuino and that will be launched once I’ve got used to the whole set of logistics that are involved in HAB. I’d also like it to do something special rather then just send the normal telemetry back down to earth. I’m working on that.

Meanwhile, I have built Chris’s circuit board and christened it Vayu after the Indian god of the air and wind. It has an additional outboard regulator to take 1.5Volts up to 3.3Volts which is what the tracker circuit requires to run.

Vayu-1 HAB Payload

Vayu payload. Designed by Chris Stubbs.

The outboard regulator is actually a 3Volt to 5Volt version but you can substitute one of the SMD resistors to convert it. This isn’t ideal so I am currently re-designing the board with the regulator incorporated as well as a few other features I think would be useful. The regulator I have chosen is a Texas Instruments TPS61016 which is variable but will do the job with minimum component count.

One thing I wanted to do with Vayu’s telemetry is update the representation of time. The old code sent a string of numbers in HHMMSS format. I wanted it to send HH:MM:SS. Not being very experienced in ‘C’ programming, it took me one and a half days to research the problem and fix it. One of the issues was that I was using the Arduino IDE (Integrated Development Environment). Although this gives really easy access to program Arduinos with a language very similar to ‘C’, it isn’t fully compatible. I proved this by running a piece of code I’d written in Microsoft’s Visual C++ Express environment. It worked fine. As soon as I tried it in Arduino, no go. The character string was corrupted. Eventually, I found a complete different solution to the problem.

Another thing I wanted to do was make the telemetry useful in another way, not just for payload data. Chris showed me how to add another string of characters to the output.

$$$$VAYU, 97, 11:36:16, 51.452801, 00.176368, 15, 8, 1, 1, 2.83, 29*591F
Info at: http://www.projecthab.co.uk
$$$$VAYU, 98, 11:36:24, 51.452789, 00.176347, 15, 8, 1, 1, 2.87, 29*5E56
Info at: http://www.projecthab.co.uk

This is what the telemetry looks like now. As you can see, the time value near the beginning of the string includes colons to read easier and the telemetry string is interspersed with the address of this website. Hopefully, new enthusiasts will find this and use this site for reference, or at least a pointer to the UKHAS website which has a mound of info for HABers.

Hopefully, Vayu will fly soon. I am just awaiting funds for helium and a few other parts. Rest assured, I will write it up here when the time comes.


Posted in Payloads, Tracking | Tagged , , , , , , , | 2 Comments